Building a new campaign
-
A nonprofit may have separate campaigns for general supporters, volunteers, donors, and staff.
-
A company with a global customer base may have separate campaigns for each country, region, or language.
For more information, see Planning your text-messaging campaign.
The initial messages in a campaign request permission to send text messages to your subscribers, allowing mobile users to sign up for (opt in to) your campaign. For more information, see Setting up opt-in messages.
After the subscriber has opted in to your campaign, you can add one or more components, or messaging segments that accomplish a set task, to your campaign. Use components to collect information about the subscriber and their interests or to distribute special offers for new subscribers. For more information, see Adding components.
To set up a campaign:
For more information, see Managing your campaigns.
Creating a new campaign
To create a new campaign:
-
Verify the originator for this campaign. This is the short code or long code or alphanumeric sender ID for branding (Waterfall UK only) for all messages sent or received.
-
If only one originator code is available, select
 Settings to see the active short or long code or alphanumeric sender ID for branding (Waterfall UK only).
 -
If more than one originator code is available to you, check the title bar, which displays the active short or long code or alphanumeric sender ID for branding (Waterfall UK only) and a flag indicating the country of origin (United States or Canada or United Kingdom).
Tip: If more than one code is available, you can change the active code. Select
Settings and review the Originators list. The current originator has a check mark next to it. To change the originator, select a different short code or long code or alphanumeric sender ID for branding (Waterfall UK only) from the Originators list. -
If a label (alphanumeric) has been assigned to the originator in the admin application, it will also be displayed next to the originator value in Waterfall.

If the label is too long to display in full, hover over it to see the complete name in a tooltip.

Note: You can include spaces before and after the hyphen in the label name—for example, “98557 – samplename.” Originators can have editable labels (up to 20 characters, including spaces), added through the admin application. These labels will appear in the Waterfall application alongside the long code or short code.
-
-
To set up a new campaign, from the Campaigns menu, select Campaigns.

 Campaigns table
The Campaigns table contains the following information for each campaign:
-
Link to the campaign
-
The number of lists that will determine the recipients of messages for this campaign; new subscribers will be added to the selected list(s).
-
The actions available for this campaign:
-
Edit
-
Clone
-
Delete
-
-
-
In the upper-right corner, select Create New Campaign.
-
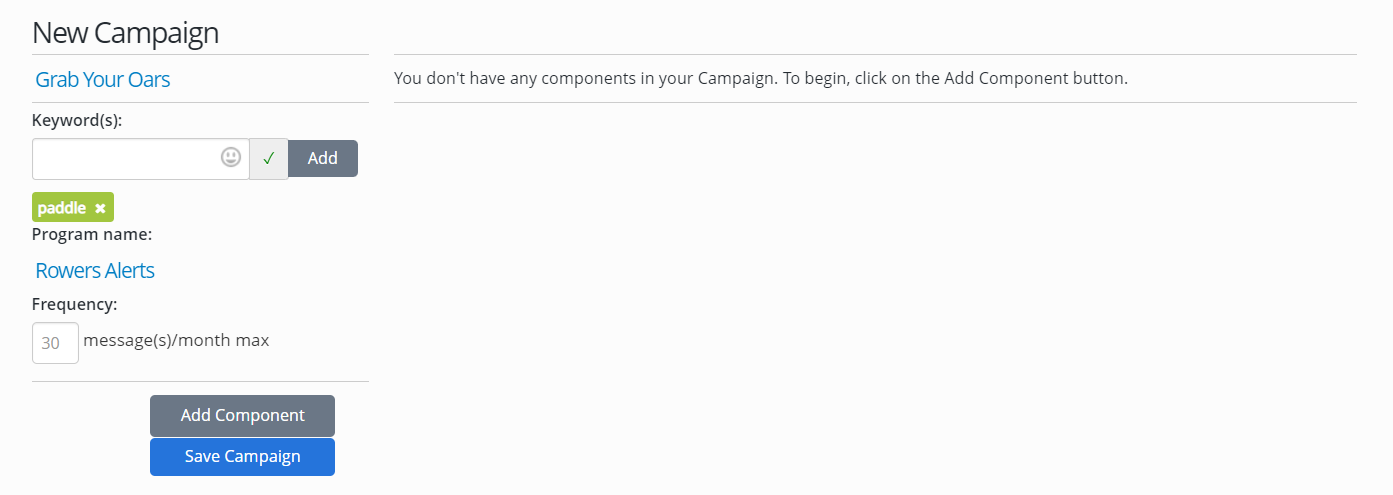
In the New Campaign form, enter a unique name for your campaign.
-
In the Keyword field, enter a keyword name (up to 16 characters) or select an emoji from the
 Emoji list. When you see a green check mark indicating that the name or emoji is available for your campaign, select Add.
 Note: Keywords are not case sensitive.
Keywords
Keep the following tips in mind when you add keywords to your opt-in message:
-
Avoid generic or common words, like MORE, IF, or THE, which could lead to unintended opt-ins.
-
To lessen the chance of typing errors, keep your keywords as short as possible.
-
Choose keywords that are easy to spell correctly (and less likely to be autocorrected).
-
Avoid acronyms or a mix of numbers and letters.
-
Add backup keywords, such as near spellings and misspellings, for users who do not enter the keyword exactly. For example, if the keyword is BIGSALE, you may want to add SALEBIG and BIGSLAE.
Some words are reserved and not available for use as keywords:
-
HELP represents a request for instructions on texting, including the keywords your company recognizes.
-
CLEAR or STOP represents a request to remove the mobile phone number from the campaign.
-
INFO represents a request for your company name and customer service information.
In Canada, French and English terms (STOP/ARRET, HELP/AIDE) are reserved and must return a response in the same language. INFO is reserved for both languages and must return a bilingual (French and English) response.
Tip: Be sure to specify a keyword to restart a subscription if a mobile user opts out accidentally, for example, RESTART or UNSTOP. Work with Technical Support to set up the standard keywords for your account.
-
-
In the Program name field, enter a name that will be visible to recipients in your text messages, for example, Company News Flash or Sale Alerts.
-
In the Frequency field, enter the maximum number of messages you will send to recipients in the course of a month from this campaign. This value will be visible to recipients in the confirmation message.
Tip: Be respectful of your customers' time and attention when you determine how often you will send messages.
At a minimum, aim to contact subscribers at least once every three months. If you let too much time elapse between messages, subscribers may question the origin of a message.
-
To create the campaign, select Save Campaign.
Your campaign is added to the Campaigns table, though you remain on the New Campaign page, where you can add message templates (components) to your campaign.
For next steps, see Setting up opt-in messages and Adding components.
The campaign settings are in the panel on the left; the components will be listed in the panel on the right.