Testing the effectiveness of your messages
Set up two separate messages (A and B) to send to two randomly selected groups of recipients from the list(s) or smart segment(s) you select. Track the results with Waterfall reports to determine which message was more effective in achieving your goal.
For example, if you want to generate more revenue from sales, set up A/B testing for two separate coupon codes. Send the first code (20% off storewide) to group A and the second code (40% off a single item) to group B. When customers redeem their coupons, you can measure to which coupon variation achieved better results.
For information on sending a broadcast message without using A/B test groups, see Building a new broadcast.
Setting up A/B split testing
To set up broadcast messages using A/B testing:
-
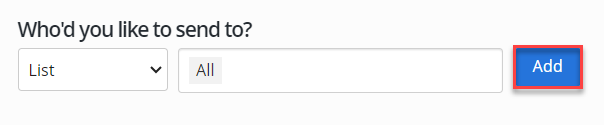
From the Broadcasts menu, select Send.
-
To define the subscribers who will receive your message, select List or Smart Segment from the dropdown list, and then select a list or smart segment from the adjoining drop-down list.
-
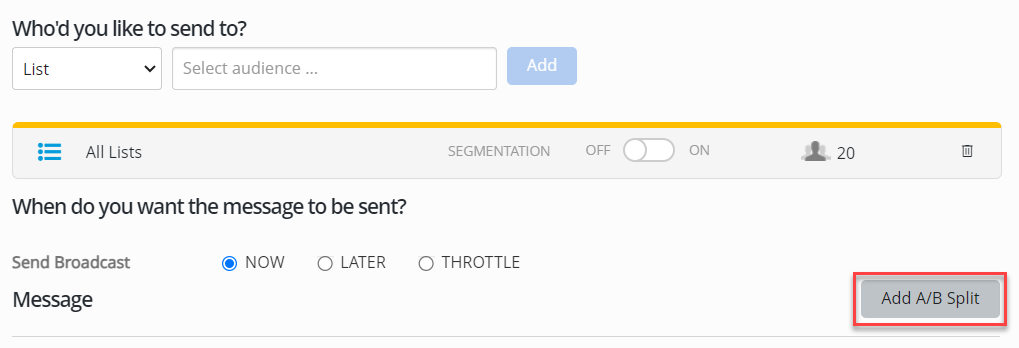
Select Add.
The broadcast form expands, adding the subscriber group below the List or Smart Segment field. The right panel lists previously sent messages and upcoming scheduled messages.
If you selected a smart segment, the segmentation slider is set to On and the segmentation options are added to the form.
Depending on your audience selection, you can continue to add lists or smart segments, which will stack below the List or Smart Segment field.
Note: You cannot mix lists and smart segments in your audience selection. If you change your selection, you will see a confirmation message. Select Yes to clear the previous selection.
-
Select the delivery date:
-
To send the message immediately, leave the Send field blank.
-
To schedule a message, specify a Send date and time:
-
Select
 Calendar and select a date.
 -
Select
 Time at the bottom of the calendar and use the up and down arrows to select a time.
 -
Select
Calendar. -
(Recommended) Optionally, select the Send in subscribers' local time checkbox.
Note: The subscriber's local time is determined by their profile data, including the area code for their mobile phone number.
-
-
To reset the send date and time, select
 Clear.
-
-
Review the list(s) of subscribers who will receive the message.
-
To remove a list or smart segment, select
 Delete at the end of the row.
 -
To refine a group of recipients in a list, drag the Segmentation slider to select ON and then specify the segmentation options for the subscribers in the selected list. For more information, see Building a new smart segment.
-
-
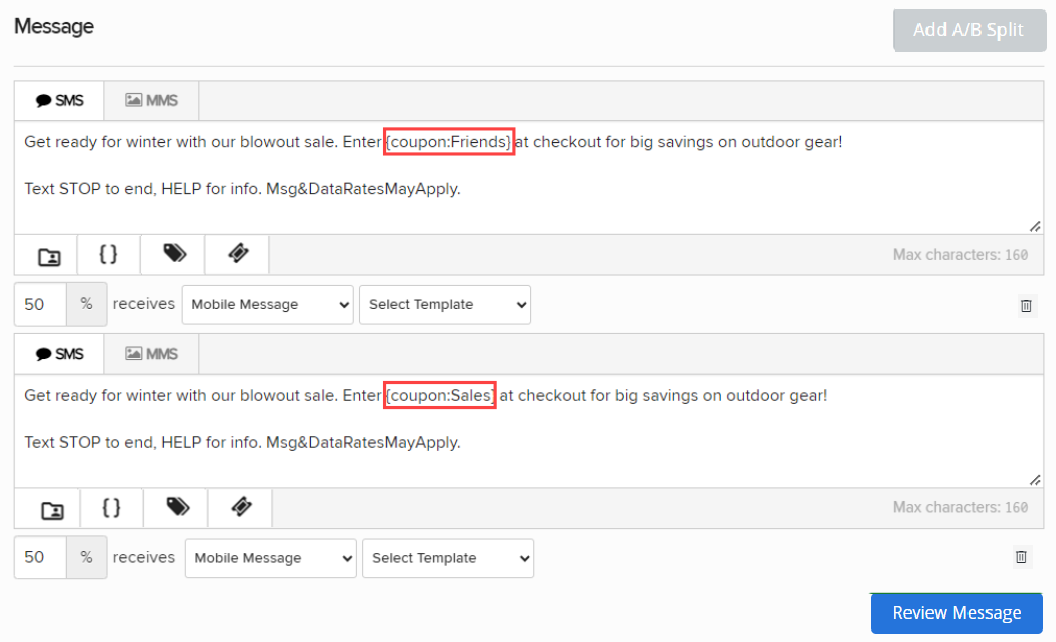
To test your message using A/B test groups, select Add A/B Split. The broadcast form is divided into two separate test groups, representing a 50/50 split for your test groups.
-
For each message, select the percentage of recipients in the selected list(s) or smart segment(s). If you need to adjust the messages to ensure a 100% total:
-
To add a message, select Add A/B Split again.
-
To remove a message, in the lower-right corner, select
Delete .
Note: The percentages must add up to 100 percent.
-
-
To base one or more messages on a standard broadcast template, under the text box, select a template from the Select Template dropdown list. The message is added to the text box. You can edit it as needed. For more information, see Working with templates.
-
For each message, select SMS (plain text message) or MMS (multimedia message, including images, videos and audio) for the message, and then enter your message in the text box.
Tip: Be sure to add the opt-out disclosure (for example, "Reply STOP 2 quit") to your broadcast message.
Note: MMS messaging is available in the United States and Canada only.
-
 SMS messages
For SMS messages, you can include some or all of the following customizations to add interest to your message:
-
Header (if available): Select
 Header and select one or more identifying details from your log-in account to add to the top of your message:
 -
Name: your first name and last name, if available; if unavailable, your log-in user name
-
Mobile: the mobile number associated with your user name
-
Company (Subaccount): the company or subaccount you are using when you add the header
When you are done, select Apply.
-
-
Dynamic insertion: Select
 Dynamic Insertion and select a metadata field from the dropdown list, then add a default value to display when a value is not available in a subscriber's profile. Select Insert to add the field to your message.
Tip: Adding a default value is highly recommended; otherwise, when a subscriber's profile does not include a value in the selected field, the entry in your message will be blank.
-
Tag metadata: Select
 Tag Metadata and select a metadata field from the dropdown list. Specify a static or dynamic value for the metadata field:
-
To specify a static value, enter a value in the Metadata tag field.
-
To specify a dynamic value, enter one of the following tokens in the Metadata tag field:
-
$keyword: the keyword texted by the user
-
$MM$dd$yyyy: today's date
-
$inc: the value in a number field plus 1
-
$dec: the value in a number field minus 1
-
-
-
Link shortener (if available): Select a URL in your message and then select
 Link shortener. Select Insert to reduce the character count by adding a shortened link to your message.
 -
Coupon code (if available): Select
 Add Coupon and select a coupon code from the dropdown list. Select Insert to add the code to your message. For more information, see Adding coupon codes.
When you are done, select OK.
Note: A simple text message is limited to 160 characters. Check the lower-right corner for the remaining character count. If the number is negative and red, then the message is overlong and may be split and sent as a multipart SMS message.
-
-
MMS messages
For MMS messages, you can include some or all of the following customizations to add interest to your message:
-
Header (if available): Select
Header and select one or more identifying details from your log-in account to add to the top of your message: -
Name: your first name and last name, if available; if unavailable, your log-in user name
-
Mobile: the mobile number associated with your user name
-
Company (Subaccount): the company or subaccount you are using when you add the header
When you are done, select Apply.
-
-
Dynamic insertion: Select
Dynamic Insertion and select a metadata field from the dropdown list, then add a default value to display when a value is not available in a subscriber's profile. Select Insert to add the field to your message.Tip: Adding a default value is highly recommended; otherwise, when a subscriber's profile does not include a value in the selected field, the entry in your message will be blank.
-
Tag metadata: Select
Tag Metadata and select a metadata field from the dropdown list. Specify a static or dynamic value for the metadata field:-
To specify a static value, enter a value in the Metadata tag field.
-
To specify a dynamic value, enter one of the following tokens in the Metadata tag field:
-
$keyword: the keyword texted by the user
-
$MM$dd$yyyy: today's date
-
$inc: the value in a number field plus 1
-
$dec: the value in a number field minus 1
-
When you are done, select OK.
-
-
Link shortener (if available): Select a URL in your message and then select
Link Shortener. Select Insert to add a shortened link to your message. -
Custom image file: Select
 Image and navigate to locate the image file (.gif, .jfif, .pjpeg, .jpeg, .pjp, .jpg, .png, or .vcf) up to 3 MB. Select Open to add the image to your message.
 -
Custom video file: Select
 Video and navigate to locate the video file (.3gpp, .m4v, .mp4, .mpg, .mpeg, .avi, .wmv, or .mov). Select Open to add the video to your message.
 -
Custom audio file: Select
 Audio and navigate to locate the audio file (.mp3 or.wav). Select Open to add the audio to your message.
 -
vCard file: Select
 vCard and navigate to locate the vCard file (.vcf). Select Open to add the vCard to your message.
 -
Emoji: Select
 Emoji to select an emoji from the catalog.
 -
Coupon code (if available): Select
Add Coupon and select a coupon code from the dropdown list. Select Insert to add the code to your message. For more information, see Adding coupon codes.
-
-
-
For each message, select a messaging option from the dropdown list:
- Mobile Message sends the SMS or MMS message to the specified recipient list according to the schedule you select.
-
Forward to campaign sends the SMS or MMS message as part of the campaign you select from the dropdown list. Use this option when you require a response or multiple messages.
-
No message grays out the message box, so you cannot add a message. Use this option to do the following without sending a message:
-
Tag smart segments with metadata values.
-
Generate counts of users in smart segments.
-
Define audience criteria and A/B groups.
-
-
When you are done, select Review Message.
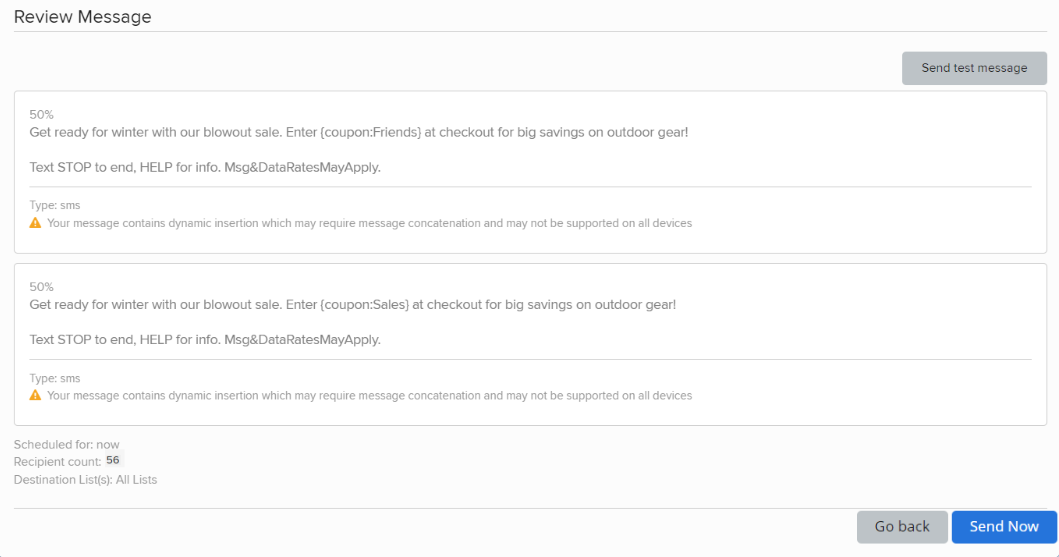
You see a preview of your message, plus the schedule for sending, number of recipients, and guidance on improvements you may want to make.
Note: If you have added a header, the details you selected (name, mobile, and/or company) appear at the top of the message.
-
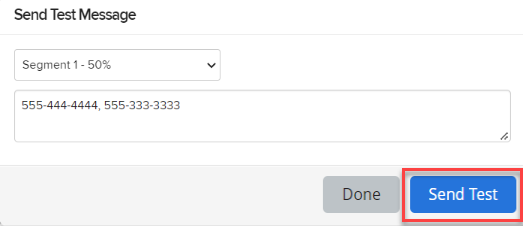
(Recommended) Select Send test message, select a segment from the drop-down list, and then enter one or more mobile numbers, separated by , (comma). Select Send Test.
-
When you see a notification that the test message has been sent, select Done. Review your test message on your mobile device(s).
-
To continue working on your message, select Go Back, make final revisions to your messages, schedule, and recipient list, and then select Review Message to double-check your changes.
-
When you are satisfied with your message, select Send Now or Schedule.
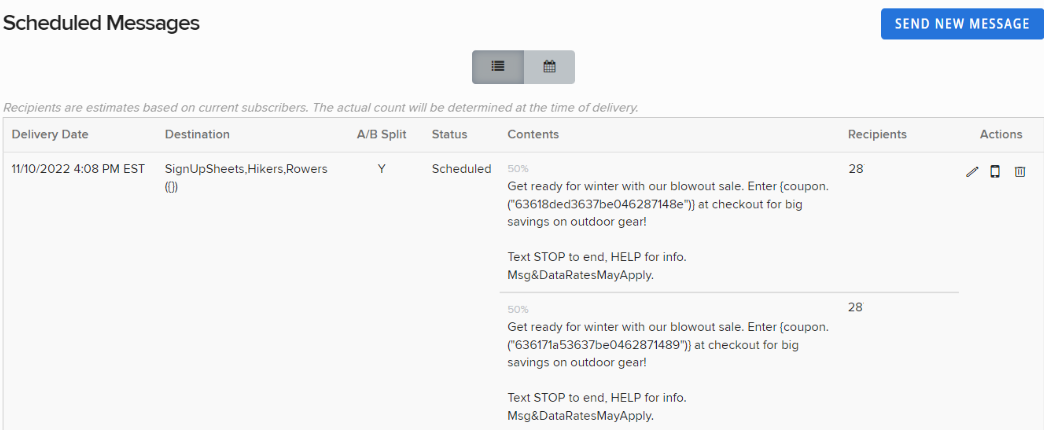
Your test messages are added to the Scheduled Messages table until they are sent.