Sweepstakes
Note: In a sweepstakes contest, the prize is awarded after the contest ends; in a text-to-win contest, winners are selected during the course of the contest. For more information, see Text-To-Win.
For more information on working with campaigns, see Creating a new campaign or Editing a campaign.
To add the Sweepstakes component from the campaign page:
-
Select Add Component.
-
Select Sweepstakes from the dropdown list, and then select OK.
-
If components have already been added to the campaign, select the placement of the new component in the list on the right.
The component is added to the list.
-
Select the component name to open the form.
-
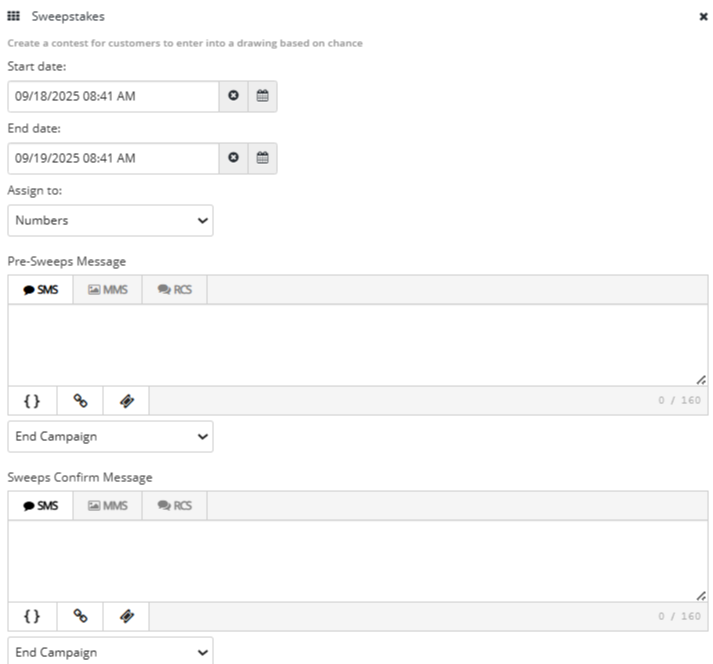
In the Start Date field, select
 Calendar and select the start date for accepting sweepstakes entries. To set the time, select
  Time at the bottom of the calendar.
 You can edit the date and time in the date field. To clear a date and time setting, select
 Clear Calendar.
 -
In the End Date field, select
Calendar and select the end date for accepting entries. To set the time, select Time at the bottom of the calendar. -
In the Assign to field, select an existing list from the drop-down list or, to create a new list, select + Create new list, enter a unique list name, and then select Add new list.
-
Enter the Pre-Sweeps message for users who text the keyword before the start date, asking them to try again later.
To add a message, select SMS (plain text message), MMS (multimedia message, including images, videos and audio), RCS for each message, and then enter your message in the text box. For more information on RCS messaging, see Using Rich Communication Services (RCS) messaging in Waterfall.
Note: MMS messaging is available in the United States and Canada only.
 SMS messages
For SMS messages, you can include some or all of the following customizations to add interest to your message:
-
Header (if available): Select
 Header and select one or more identifying details from your log-in account to add to the top of your message:
 -
Name: your first name and last name, if available; if unavailable, your log-in user name
-
Mobile: the mobile number associated with your user name
-
Company (Subaccount): the company or subaccount you are using when you add the header
When you are done, select Apply.
-
-
Dynamic insertion: Select
 Dynamic Insertion and select a metadata field from the dropdown list, then add a default value to display when a value is not available in a subscriber's profile. Select Insert to add the field to your message.
Tip: Adding a default value is highly recommended; otherwise, when a subscriber's profile does not include a value in the selected field, the entry in your message will be blank.
-
Link shortener (if available): Select a URL in your message and then select
 Link Shortener. Select Insert to reduce the character count by adding a shortened link to your message.
 -
Coupon code (if available): Select
 Add Coupon and select a coupon code from the dropdown list. Select Insert to add the code to your message. For more information, see Adding coupon codes.
Note: A simple text message is limited to 160 characters. Check the lower-right corner for the remaining character count. If the number is negative and red, then the message is overlong and may be split and sent as a multipart SMS message.
MMS messagesFor MMS messages, you can include some or all of the following customizations to add interest to your message:
-
Header (if available): Select
Header and select one or more identifying details from your log-in account to add to the top of your message: -
Name: your first name and last name, if available; if unavailable, your log-in user name
-
Mobile: the mobile number associated with your user name
-
Company (Subaccount): the company or subaccount you are using when you add the header
When you are done, select Apply.
-
-
Dynamic insertion: Select
Dynamic Insertion and select a metadata field from the dropdown list, then add a default value to display when a value is not available in a subscriber's profile. Select Insert to add the field to your message.Tip: Adding a default value is highly recommended; otherwise, when a subscriber's profile does not include a value in the selected field, the entry in your message will be blank.
-
Link shortener (if available): Select a URL in your message and then select
Link Shortener. Select Insert to add a shortened link to your message. -
Custom image file: Select
 Image and navigate to locate the image file (.gif, .jfif, .pjpeg, .jpeg, .pjp, .jpg, .png, or .vcf) up to 3 MB. Select Open to add the image to your message.
 -
Custom video file: Select
 Video and navigate to locate the video file (.3gpp, .m4v, .mp4, .mpg, .mpeg, .avi, .wmv, or .mov). Select Open to add the video to your message.
 -
Custom audio file: Select
 Audio and navigate to locate the audio file (.mp3 or.wav). Select Open to add the audio to your message.
 -
vCard file: Select
 vCard and navigate to locate the vCard file (.vcf). Select Open to add the vCard to your message.
 -
Emoji: Select
 Emoji to select an emoji from the catalog.
 -
Coupon code (if available): Select
Add Coupon and select a coupon code from the dropdown list. Select Insert to add the code to your message. For more information, see Adding coupon codes.
Note: If an icon is grayed out, it is unavailable.
-
-
Select one of the following actions after the Pre-Sweeps message is sent:
-
To forward the user to another campaign, select Forward to Campaign from the dropdown list and then select the campaign from the adjacent dropdown list.
-
To move the user on to the next component in the campaign, select Deliv. Next Component from the dropdown list.
-
To end the campaign, select End Campaign from the dropdown list.
-
-
Enter the following messages:
-
Sweeps Confirm message for users who text the keyword to enter the contest.
-
Post-Sweeps message for users who text the keyword after the end date, informing them that the contest has ended.
-
Already Entered message for customers who submit duplicate entries.
-
-
For each message, select the one of the following actions after the message is sent:
-
To forward the user to another campaign, select Forward to Campaign from the dropdown list and then select the campaign from the adjacent dropdown list.
-
To move the user on to the next component in the campaign, select Deliv. Next Component from the dropdown list.
-
To end the campaign, select End Campaign from the dropdown list.
-
-
When you are done, select Save Campaign.
-
You can continue adding components or return to the Campaign table:
-
To continue adding components, see Adding components.
-
To return to the Campaigns table, select Campaigns from the Campaigns menu.
-
Note: To rearrange the order in which messages are sent by your campaign, select a component and drag it to a new position in the list.
When your sweepstakes contest has run to its conclusion, you're ready to draw the winner(s). For more information, see Managing sweepstakes contests.